
Deploying DNSSEC with PowerDNS
I’ve been using DNSSEC signing for a while with PowerDNS. I recently started signing my primary DNS zone (garraux.net). It’s very easy to get started with DNSSEC using PowerDNS, I’ll explain how to do so below.
DNSSEC is a mechanism for signing DNS records. It allows DNS resolvers / clients to cryptographically verify that the DNS response they received is valid and authorized by the owner of the zone. Without DNSSEC, if someone were able to intercept your DNS traffic, they could maliciously modify the responses to your DNS queries so that the DNS records appear to resolve to a different IP address than they actually are pointing to. ( This could be used to send you to a phishing site for instance. ) Today, many DNS resolvers and clients are not validating DNSSEC signatures. It’s becoming more common though. Google’s Public DNS service (8.8.8.8) now performs DNSSEC validation.
My External Authoritative DNS Seutp
Prior to a couple years ago, I used Dyn to host my external DNS zones (like garraux.net). I only had a single VPS externally at that point, and I wasn’t comfortable on relying on my home connection for serving DNS, so I felt it would be best to use their nameservers for my zones.
Later on, after I had VPS hosts from a couple different providers I started looking at serving DNS for my zones off of the VPS’s.
For simplicity’s sake, I wanted to use bind style zone files. I also wanted to be able to use DNSSEC with a minimum of hassle. PowerDNS is a great fit for this. It supports a wide variety of backends, including databases (like MySQL), and simple text zone files. Additionally, it supports live DNSSEC signing. Many other authoritative DNS systems use pre-signing with DNSSEC. This would make DNS changes more complicated than just updating the zone file. So the live signing feature was attractive to me a well.
Getting Started
Assumptions: The steps below assume that you already have your zones delegated to your servers and that they are configured / working properly using PowerDNS with bind zone files.
-
First, you’ll want to check if your DNS registrar supports DNSSEC. You’ll need to be able to create DS records for your zones. My domains are registered with DynDNS - they let you easily configure DNSSEC on the zones you have registered with them through a web GUI.
-
Next, make sure you have a recent version of PowerDNS installed on the master for your zones. The DNSSEC support for bind zone files was added in PowerDNS 3.1, but version 3.3.1 (the current latest release) is recommended.
-
Modify the pdns.conf file on your master to tell PowerDNS the path to the SQLite database where the private DNSSEC information is stored.
bind-dnssec-db=/etc/powerdns/bind-dnssec.db -
Create the actual DNSSEC database by using the pdnssec command.
pdnssec create-bind-db /etc/powerdns/bind-dnssec.db -
Sign the zone
pdnssec secure-zone <zone name>This generates the keys and signs the records. The keys will stored in the DNSSEC DB file. The actual zone file on the master will not be changed…it’ll still just be a normal bind style zone file with no RRSIG records (the signatures for each of the records in your zone). When DNSSEC aware recursors query the master for RRSIG records, the master will generate the RRSIG record on the fly for the response.
-
Update the zone’s serial and replicate it to the slave servers for your zone. After incrementing the zone serial, you can run the command below to notify the slaves of the update.
pdns_control notify <zone name>This will push the signed zone out to your slave servers. When you look at the zone file on the slave servers, you’ll see that it includes RRSIG records. PowerDNS replicates a signed copy of the zones to the slave servers.
The beauty of this kind of set up is that your slave servers don’t actually have to know anything about DNSSEC (or have access to the private keys). They just serve the DNSSEC records like they do any other record. This also means that you don’t have to use PowerDNS for your slaves…you can use anything as long as it’ll transfer the zones from PowerDNS. However, if you use a different authoritative DNS server (other than PowerDNS), you will need to configure the “SOA-EDIT” setting in PowerDNS, to ensure that the slave servers are notified when PowerDNS re-signs your records every week. Here is an article by Jan-Piet Mens that explains the SOA-EDIT setting.
-
Finally, you’ll need to create DS records for your zones through your registrar. This tells the rest of the world who they should expect to be signing records for your zones. To do this, run
pdnssec show-zone <zone name>This will output the information you’ll need to configure the DS records. It will include a couple lines like this:
 DS = garraux.net IN DS 46244 8 1 7bd434be47af1254920e18f4c677d70b4a260db1 ; ( SHA1 digest )

 DS = garraux.net IN DS 46244 8 2 4296d5289fcfa913e62d6c45df28a5e7b78133bd483c9771f55c32f39a54cc31 ; ( SHA256 digest )
The process to actually add the DS records will vary based on your registrar. With DynDNS, you can do this via My Zones / Domains -> Domain Registration for zone -> Create new DNSSEC DS record.
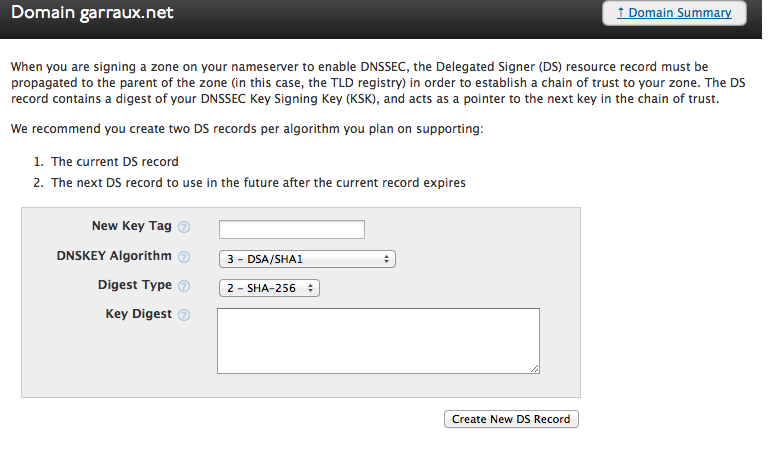
You’ll need to create two DS records - one for each of the DS entries in the pdnssec show-zone output. The DS lines that show-zones prints out are the bind style records that need to be added to your parent DNS zone. To add them into Dyn’s web GUI, you need to know what each of the fields in the record is. Here’s the format of the DS record:
DS = <zone name> IN DS <key tag> <dnskey algo> <digest type> <key digest>So, here is what you would need to configure for the first DS record in my garraux.net example:
 * Key tag: 46244
 * DNSKEY Algorithm: 8 (RSA / SHA-256)
 * Digest Type: 1 (SHA-1)
 * Key Digest: 7bd434be47af1254920e18f4c677d70b4a260db1
And for the second DS record:
 * Key tag: 46244
 * DNSKEY Algorithm: 8 (RSA / SHA-256)
 * Digest Type: 2 (SHA-256)
 * Key Digest: 4296d5289fcfa913e62d6c45df28a5e7b78133bd483c9771f55c32f39a54cc31

And that’s all there is to it.
Testing
Once you’ve added the DS records it’s time to test. Many recursive resolvers don’t enforce DNSSEC validation toady, but it will be becoming more common in the future. So if you’ve made a typo when adding the DS records for instance, your zone may not resolve for some users. There are a couple very useful sites that help with testing:
You’ll want to enter the name of your zone into each of those sites and ensure that they verify successfully with no issues. As an example, here are screenshots of what they report for garraux.net:


Also, verify that DNS records in your zone resolve correctly through Google’s public DNS service. Assuming you have a www record for your zone, you can run this on a Linux host with dig installed:
dig @8.8.8.8 www.<zone name>
Final Notes
The live method of DNSSEC signing I used here may not be appropriate for folks who expect to see a very high volume of DNS traffic. If performance on the master becomes a problem, you could look at pre-signing the zones, or potentially continuing to use live signing on a master, but configure it to be a hidden master (so that queries from resolvers only hit the slave system that have the signed copy of the zone).
If you have any questions about PowerDNS or DNSSEC or thoughts on this in general, please leave a comment below!