
SAML IDP and SP on F5 APM
Along with more “pure” Layer 2 - 4 data center networking, I also work a lot at application level with apps that we load balance and provide services for. One of those services is single sign on using F5 APM. We have recently started doing proof of concepts with the SAML functionality on the F5 APM.
I have a lab F5 virtual edition at home, and I tried out the SAML SP and IDP functionality on it to familiarize myself last weekend. In this post, I will run through how I set this up at a high level. I’m not an expert on SAML, and don’t claim that this is a perfect SAML deployment, but it’s a fairly simple way to get started. The specific scenario I labbed out here isn’t necessarily a realistic one…while you might have a single APM act both as a SAML IDP and SP, you would likely be using partners / service providers as well. It’s easy to set up a small SAML lab though with just an APM since it can serve as both components. I assume you have a basic understanding of F5 APM concepts.
SAML Overview
SAML (Security Assertion Markup Language) is a mechanism for separating authentication from the application that needs to know the user’s identity. It allows one party (called the IDP or Identity Provider) to authenticate a user and provide them with a SAML assertion (a signed token). The user proves their identity to the other party (called the SP or Service Provider) by sending them the SAML assertion. This all happens over HTTP.
You might think of it as a “web based Kerberos”. The user authenticates to an IDP instead of a KDC, and instead of being given a Kerberos ticket, they have a SAML assertion.
The SAML process can be kicked off by the user accessing either the SP or the IDP. If the user access the SP, they will be redirected to the IDP, where they will authenticate, and be redirected back to the SP, with a SAML token. Here’s a quick picture of what the traffic flow looks like in an SP initiated SAML session. Note, that while the SP and IDP are both configured on the same F5 APM in this instance, they act independently and only communicate with each other through the HTTP requests from the user.

IDP Configuration
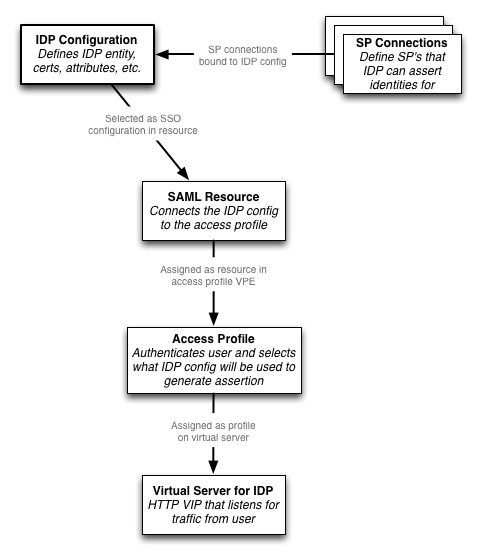
Here’s an overview of the IDP configuration objects on the APM:
-
The first thing you’ll need to do is configure the IDP settings. This is under Access Policy -> SAML -> BIG-IP as IdP.

-
The entity ID should be the URL under which the SAML IDP will be accessible. https://saml-idp.garraux.net for instance.
-
You also will need to configure the assertion settings - which will indicate what value the IDP will use to identify the user in the assertion (effectively the username). Your IDP will also need to have an SSL certificate + key. The user won’t necessarily see this certificate, it will be used to sign the SAML assertion. I just used the same cert as I had applied to the LB VIP for the IDP though, to keep things simple.
-
Next, should export the metadata for the IDP that you just configured. This will export an XML file describing the IDP service that will help when configuring the SP side.
-
The last SAML specific step is to create a SAML Resource, which will be referenced later in the visual policy editor. It tells the APM which IDP to use. It’s available under Access Policy -> SAML -> SAML Resources. You’ll just fill in the name / caption and select the IDP to use.
-
Create a new access profile for the IDP. This will be assigned to the virtual server for your IDP. The access profile for the IDP needs to authenticate the user (using a mechanism of your choosing…in my example below I obtain the user’s credentials via a form, and authenticate them using RADIUS). After authenticating the user, assign resources to the session - I used a webtop and the SAML resource we created in step 5.

-
Last, assign the SAML access profile to the virtual server. You’ll also need an HTTP profile, but other than that, nothing special.
SP Configuration
Here’s what the SP configuration on the APM looks like at a high level:
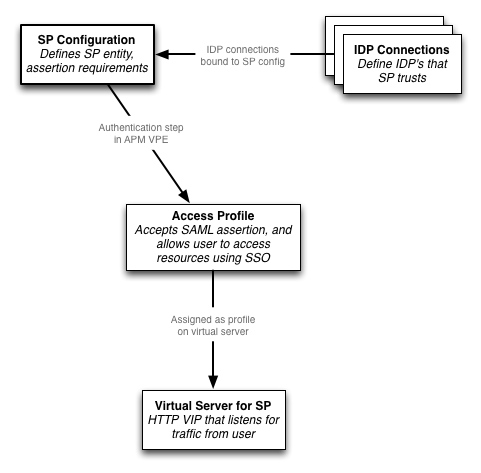
- The SP configuration was fairly intuitive. First, you’ll start out with creating a SAML SP (in the menu under Access Policy -> SAML -> BIG-IP as SP). Again, you’ll need to define an entity ID (for the SP this time). This should be a URL that points to the virtual server that the APM SP access profile will be assigned to.SAML has a concept of an assertion consumer service - this is the URL that the IDP will redirect the user to when it sends them their signed assertion. The APM will build this URL based on the SP entity ID. If your SP entity ID is https://saml-sp.garraux.net, the APM will use https://saml-sp.garraux.net/saml/sp/profile/post/acs as the URL for the assertion consumer service. When you do the metadata export in step 2, you can see this value in the XML file.
On the security tab, you probably will want the SP to require a signed assertion from the IDP.
-
Export the metadata for the SP. We will import this into the IDP later on.
-
Create a new access profile for the SP (separate from the IDP access profile you previously created), and open the VPE. This is what my policy looked like once I was done:

-
You will need a SAML Auth step in your access profile. This will authenticate the incoming SAML assertion. You’ll need to point it to the SAML SP object you just created in step 1.
-
Also configure an SSO credential mapping step. If you want to pull the username out of the SAML assertion, you can use the session.saml.last.identity variable. You won’t actually have the user’s password, so the variable you use for that doesn’t necessarily matter.
-
You’ll want to assign some kind of resource that the user can use. In my case, this was a web top with a portal. The SSO method should either be configured in this resource, or on the access profile itself.It’s important to note that, since the SAML assertion does not provide the user’s password, the SAML SP access profile does not have access to the password (see note below). So, you are limited in terms of the SSO methods that you can use. HTTP Basic SSO, NTLM SSO, etc, all require that the APM know the user’s credentials. Kerberos constrained delegation is probably the most useful SSO method that will work in this situation.
Note - I did also make HTTP basic SSO work with SAML, by encoding an encrypted version of the password as an attribute in the SAML assertion. That gets sent as part of the assertion from the IDP to the SP. The SP decrypts the attribute, and can use it during the SSO credential mapping step. This isn’t something that would typically be done though, you wouldn’t want to send the password to an external service provider that you are federating with.
Connecting the IDP and SP
You’re not quite done yet. You’ve configured both the IDP and the SP, but they don’t know about each other yet. You’ll need to do this by creating connections and binding them to the IDP / SP configuration objects. This may feel a little redundant in this situation, but typically your IDP / SP will be federated with external providers. For example, your IDP might provide identities to Microsoft Office 365. This is where you would tell the IDP on your APM about the Office 365 SP.
-
In this step, you are telling the SP what IDP’s to trust. Select your SAML SP configuration (under Access Policy -> SAML -> BIG-IP as an SP), and hit the “Bind/Unbind IdP Connectors” button down at the bottom. Here, you’ll want to create a new IDP connector, by importing the IDP metadata file you exported back in step 4 of the IDP configuration. If you’re just using a single IDP for testing, you can leave the Matching source / value options blank.
-
Next, do the same process on the IDP side. Select your IDP configuration (under Access Policy -> SAML -> BIG-IP as an IdP), and hit “Bind/Unbind SP Connectors”. Create a new SP connector by importing the SP metadata file you exported in step 2 of the SP configuration.
Once I started working with it, SAML seems a lot simpler than I initially was expecting it to be. If you already have APM, and are wanting a quick way to start using SAML for some applications, you should definitely take a look at the SAML functionality built in to APM. It was added in 11.3 and support has been expanded in 11.4.